Monday, January 21, 2008

Oatmeal Chocolate Chip Cookies


We love cookies. Simple, sweet, fast, tasty...what's not to like? Easy to make with your kids...one of my favorites is oatmeal chocolate chip. You get some healthy oatmeal, but with chocolate. Mmmm....chocolate. It surprised a friend to know that I use the recipe on the Oatmeal box, b/c I think it is the best. Of course, that is with the qualification that you use real unsalted butter and double the chocolate chips (which go instead of the raisins).

So here is the recipe the way we've been making it. Mmmm...cookies.


Oatmeal Chocolate Chip Cookies

1/2 pound (2 sticks)unsalted butter, softened
1 cup firmly packed brown sugar
1/2 cup granulated sugar
2 eggs
1 teaspoon vanilla
1-1/2 cups all-purpose flour
1 teaspoon baking soda
1 teaspoon ground cinnamon
1/2 teaspoon salt
3 cups Oats (quick or old fashioned, uncooked)
2 cups semi-sweet chocolate chips

1. Heat oven to 350°F. In large bowl, beat margarine and sugars until creamy. Add eggs and vanilla; beat well. Add combined flour, baking soda, cinnamon and salt; mix well. Add oats and raisins; mix well.
2. Drop dough by rounded tablespoonfuls onto ungreased cookie sheets.
3. Bake 10 to 12 minutes or until light golden brown. Cool 1 minute on cookie sheets; remove to wire rack. Cool completely. Store tightly covered.

Servings: About 4 dozen

Sunday, January 20, 2008

Latin Chicken w/ Black beans & Sweet potatoes

A friend recommended this recipe to me. It reminds me of yummy coconut curry chicken and sweet potatoes in name, but flavor wise, it is very different. Not hot, like I expected, but spicy, mildly sweet maybe, reminding me a little of chicken mole.

It is written for the slow-cooker, you could adjust and bake in a casserole in the oven much faster, but I love slow cookers for providing my family with tasty dinners that I can prep easily in the morning and forget about until that evening. The recipe comes from Good Housekeeping. They even provide nutritional information if you want to track that. Me, I know its healthy, it has sweet potatoes & black beans & salsa in it. Lots of veggies, lots of color, lots of nutrients. But is it tasty? Oh yeah.

I did not use regular paprika instead of smoked paprika (don't have it) or the chipotle chiles (don't care for them). I also forgot the lime juice & roasted red pepper. Oh - and technically I used turkey broth, but is that a real change? We make our own broth, and freeze it. I've got a ton left from Thanksgiving still. Anyway it was still great, even with the forgotten ingredients from me being so hungry. (The house smelled wonderful!) (And the cilantro, lime juice & roasted red pepper would be really good mixed into the potato mixture, I recommend trying it.) Bonus - side dish built in to meal! How much easier can you get?

Slow Cooked Latin Chicken with Black beans & Sweet potatoes
Ingredients
3 pound(s) bone-in skinless chicken thighs
2 teaspoon(s) ground cumin

Salt and pepper
1 teaspoon(s) smoked paprika, or 1⁄2 tsp. chopped chipotle chiles in adobo sauce
1/2 teaspoon(s) ground allspice
1 cup(s) chicken broth
1/2 cup(s) salsa
3 clove(s) (large) garlic, crushed with press
2 can(s) (15 to 19 ounces each) black beans, rinsed and drained
2 pound(s) sweet potatoes, peeled cut into 2-inch chunks
1 jarred roasted red pepper, cut into strips (1 cup)
1/3 cup(s) (loosely packed) fresh cilantro leaves, chopped

Lime wedges

  1. Sprinkle chicken thighs with 1/2 teaspoon ground cumin, 1/4 teaspoon salt, and 1/4 teaspoon ground black pepper. Heat 12-inch nonstick skillet over medium-high heat until hot; add chicken thighs and cook until well browned on all sides, about 10 minutes. Transfer chicken to plate. Remove skillet from heat.
  2. In same skillet, combine smoked paprika, allspice, chicken broth, salsa, garlic, and remaining 1 1/2 teaspoons cumin.
  3. In 6-quart slow cooker, combine beans and sweet potatoes. Place chicken on top of potato mixture in slow cooker; pour broth mixture over chicken. Cover slow cooker with lid and cook as manufacturer directs, on low 8 hours or on high 4 hours.
  4. With tongs or slotted spoon, remove chicken pieces to large platter. Gently stir roasted red pepper strips into potato mixture. Spoon mixture over chicken. Sprinkle with cilantro and serve with lime wedges.

Tuesday, January 8, 2008

Oatmeal Porridge


Our favorite breakfast for the past few months has been oatmeal porridge. It is a simple recipe you start the night before, and it has made it so that I can't eat instant oatmeal any more, it's so good. Serve with hot chocolate on a cold morning for a good warm you up breakfast. :)

Put equal parts regular oats and water in a bowl, add 1 Tbsp of whole milk plain yogurt or creme fraiche and mix. (I do 2 cups oats, 2 cups water, 2 Tbsp yogurt for our family usually). Cover with a clean towel and let sit overnight.

Put water on to boil, the same amount you put in the oats the other night (2 cups for me). When it is boiling, add the oat mixture and simmer to a good thickness, stirring frequently.

Serve with more yogurt or cream, apple butter, favorite jelly, honey, fresh fruit or whatever else you want to add for sweetness/flavor. Or eat plain!

Our favorite toppings:
Homemade apple butter mixed in tastes like apple cinnamon oatmeal.
More yogurt and fresh peaches makes peaches & cream oatmeal
Blueberries & yogurt
Strawberry jam
cinnamon, brown sugar & raisins...
lots of options!

Monday, January 7, 2008

Chocolate madeleines

The first time I saw madeleines was on the TV show Friends. Since they were a cute shell shaped French cake cookie, I was intrigued. Also, they said they were hard to make. Double bonus!

Since then, I have always wanted to try them, but never have, because they require a special pan. The chocolate therapy challenge was a great reason to buy a madeleine pan! I will be trying a non-chocolate madeleine recipe as well, but first and most important is the chocolate recipe. My source is La Tartine gourmande. Since her recipe requires a kitchen scale and I don't have one, and also is not detailed enough for this madeleine beginner, I had to supplement it with info from 101 cookbooks madeleine recipe and a conversion website.

I ended up using mostly dark chocolate with mint, since that's what I had in the fridge. I also overfilled the molds the first time, since 3/4 full of a shell shaped mold is kind of hard to see. Overfilling them is bad, since they stick to the mold more. I think there is a skill there you have to develop to have all your madeleines look awesome like pictures I've seen. Mine turned out okay. The batter recipe is easy, it is getting beautiful looking madeleines that is the hard part.

I'd also appreciate the recipe saying put in a heaping 1 Tbsp (approx amount for regular madeleine molds I'd say), since that would be easier to measure/see. Also, unmold them on a flat surface instead of wire racks for better luck IMO.

The flavor and texture was great. It was like a little cake, delicate and light and chocolatey. Yum! They are rich and delicious. The chocolate mint worked really well for me. MMM...

Photos: Top are my 4 best madeleines. Next is my first batch, which mostly fell apart, trying to unmold on the rack. Next is the amount I put in the molds the 2nd time, resulting in no overflow and finally a batch that I unmolded on a flat surface.

Here is the recipe, modified as I did it:

Chocolate Madeleines

3 eggs
3/4 cup all purpose flour
1 cup white sugar
3.5 oz dark chocolate
4 oz (1/2 stick) butter, unsalted
1 tsp. baking powder
dash sea salt

*Place the chocolate and butter in a heat proof bowl and melt over a pot of simmering water. Let it cool down.
* Sift the flour and baking powder and keep on the side.
* Place the eggs in the bowl of a stand mixer and beat on high with a whisk attachment until they double/triple in volume (about 3 minutes).
* Reduce the speed and add the sugar in a steady stream. Increase the speed to high again and beat until lighter in color, about 2 minutes (until thick and ribbony).
* Remove the bowl and add the flour and baking powder with a wooden spoon.
* Add the cool melted chocolate and butter and blend, not overworking the dough.
* Place the batter in the fridge for a few hours before baking (minimum 1 hour).
*Use baking spray on molds or butter & flour them.
* Fill special madeleine molds 3/4 full. (Approx 1 Tbsp per mold). Do not spread out, as they will fill it while baking. Do not overfill.
* Preheat your oven at 430 F and cook the madeleines for 7 minutes first so that they rise nicely, then reduce the heat to 350 F and continue to cook for 4 more minutes.
* Unmold immediately and cool on racks. Best eaten day they are made, will keep a few days.
Makes approx 3 dozen cookies.

Tuesday, January 1, 2008

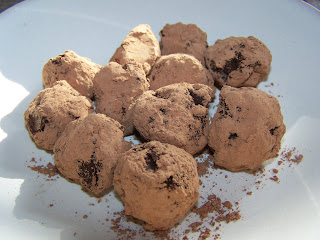
Dark Chocolate Truffles

I remember the first time someone shared their bag of dark chocolate truffles with me... wow. First you taste the cocoa, then the dark chocolate comes thru and mixes with it and melts in your mouth. Mmmm....chocolate.... :)

I'm a day late in posting and finishing these truffles since they were part of December's Chocolate therapy challenge, but I'm still sharing. These are so simple to make! I was worried they'd be delicate and easy to mess up, but nope. If you can bring heavy cream to a boil, you can make these. They may not be as pretty, but they'll sure taste as good!

I used a mix of a bag of Dove dark chocolates, Hershey's special dark, and another small bar of dark chocolate I had in the fridge to make 1 lb of chocolate. Total cost for the pound of chocolate? About $5. Considering that a pound of truffles can run up to $34 (and I've paid it...) that's a deal. But you still need some heavy cream and good cocoa powder for dusting. Not a cheap treat, but a worthy one.

Note that the mixture sits in the fridge for an hour, not overnight. If you leave it overnight (innocent whistling), you will have to have it sit out and gently warm it up (don't melt it again, you could mess it up.) But its still yummy, even if you just chip off a piece of the hardened ganache mixture and roll it in the cocoa powder.

1 lb. dark chocolate (pick stuff you like, this will be the flavor you get.)
1 cup. heavy whipping cream
cocoa powder for dusting

1. Break up chocolate into pieces, put in large heat proof bowl.
2. Heat heavy cream on stove to just boiling. (this is called scalding).
3. Pour the hot cream over the chocolate and let it sit for 5 minutes.
4. Stir the chocolate/cream mixture until it is smooth and creamy.
5. Put in the fridge for an hour to cool/thicken.
6. Scoop out balls of mix, and roll in cocoa powder to finish.
7. Try not to eat them all before sharing! ;)

Friday, December 21, 2007

Mint Oreo Truffles


Chocolate Therapy Challenge this month is truffles, and the first recipe to try for me is the easy oreo truffle. :) I first tried these about 2 months ago and mmmm...yummy...:) And simple! Well worth trying. (Visit Create Cakes for my friend's experience with truffles!)

Mint Oreo Truffles

8 oz cream cheese
1 package oreos
1 tsp mint extract
12 oz chocolate
1 tsp oil

Crush the oreos, use a food processor or just crush with a rolling pin when they are in a plastic bag. Beat the cream cheese until smooth with mixer, then mix in oreos until totally black, with no cream cheese showing. Refrigerate until firm and cold.

Shape into little balls, about a tablespoon of mix each, putting on cookie trays and then in the fridge to firm up and get cold again.

Melt the chocolate (semi-sweet chips or bars, dark chocolate bars, fancy candy chocolate, whatever is your favorite...even half chocolate/half andes bars if you want mint overload) in a double boiler, mix in the oil to make it a bit thinner and easier to use.

Have another tray with parchment paper ready, put a ball of filling in the chocolate, cover with melted chocolate, lift out with a fork, hit on edge to shake off some of the extra chocolate, place on parchment paper by scraping off fork with a small knife. Repeat with other balls, melting more chocolate if necessary (I used about 24 oz). Put back in the fridge to firm up and get cold.

If you want, melt a different colored chocolate and drizzle on the top for decoration.

Eat, share, enjoy!

(Note, I don't think you can put them in the freezer, cream cheese does NOT do well with the freezer, which is why you need a little bit of fridge space, or a cold garage or snow outside... :) )

I got 50 truffle balls, others have gotten more, it will depend on the size you make them, and how much of the filling you eat first!

(NOTE: Because of the cream cheese, these must be stored in the fridge too. But after they harden up, you can move them to a more compact storage than the trays...if they last that long.)

Monday, December 17, 2007

Thanksgiving Run Down

I still haven't posted my thanksgiving 2007 complete rundown...It was a great thanksgiving dinner! I did not get any great beautiful table shots b/c we served the food more buffet style, but I did get individual dish pics!

The turkeys were in a fight over who was better, the brined than fried turkey or the brined than roasted in the oven turkey...The winner on taste was the roasted turkey. The meat stayed much more moist and delicious. The fried turkey skin is awesome, but the meat was a bit more dried out. The look of the fried turkey is more beautiful maybe, but roasting just produced better tasting meat!

We had free range pastured turkey this year and you can really tell the difference. The legs were so much bigger! You can tell these turkeys ran around and had a good time. :P

In the shot of most of my guests eating, notice the guy in the back with the giant turkey leg! It was a great prize, the drumstick on these turkeys! Just like in medieval movies where they show large sticks o' meat.


In other dishes, we had the traditional mashed potatoes & gravy, our macaroni salad that I posted about before, traditional stuffing, orange rolls, dinner rolls, cranberry-orange relish, a butternut squash soup & the sweet potato casserole. In new adventure dishes, we had a wilted spinach salad with radishes & oranges and a warm vinaigrette, roasted green beans & carrots with a basalmic honey sauce.

For dessert there was pecan pie, fudge pecan pie, spiced pumpkin cheesecake and apple cranberry pie. I really love Thanksgiving! Writing about it makes me sentimental and hungry. Mmmm...pie... :) Here are a few pictures of foods to make you hungry too! :)

Monday, December 10, 2007

Creamy Enchilada Casserole


Nava Atlas writes great cookbooks with great recipes. The Vegetarian Family Cookbook is wonderful. Simple, great tasting, kid-friendly...what's not to like? She also does a monthly newsletter from her website with scrumptious seasonal recipes. I checked it out again from the library and have been enjoying it! :)

Creamy Enchilada Casserole

(filling)
1 Tbsp olive oil
1 small onion chopped
1 garlic clove minced
1 16-oz can vegetarian refried beans
1/2 cup mild or medium hot bottled salsa or 4-z mild green chiles
2 Tbsp minced fresh cilantro (optional)
1/2 tsp dried oregano

(sauce)
1 1/4 cups milk, rice milk or soy milk
2 Tbsp white flour
1 1/2 cups grated monterey jack or other non-dairy white cheese

8-10 corn tortillas, cut in halves
1 scallion, thinly sliced
salsa for topping (optional)

Preheat oven to 400. Oil your 9x13 pan or 2 qt casserole

Heat oil in medium skillet, add onion and saute over medium heat until translucent. Add garlic and saute until onion os golden. Stir in remaining filling ingredients and cook unitl well heated thru.

Heat 1 cup of milk in small saucepan, dissolve flour in remaining milk .Whisk into saucepan, then sprinkle in 1 cup of cheese. bring to gentle simmer, stirring frequently, and cook until thickened.

Line pan with a single layer of tortillas, pour in filling and spread evenly over tortillas. Cover with remaining tortilla halves.

Pour cheese sauce evenly over tortillas, sprinkle with remaining cheese. Sprinkle scallions over the top. Bake 15 minutes, until cheese is bubbly. Serve at once, pass around salsa for topping if desired.

N.B. I used flour tortillas, we don't like corn ones in our home, it worked fine. This recipe was delicious, and has possibilities for improvization too. :)

Sunday, December 9, 2007

Chinese Noodle Bowl


Checking out the recipe book Beggars Banquets that I saw on another blog, I found this recipe that sounded fun. It took some interpretation on a few of the ingredients, but resulted in a successful delicious dinner for our family. My boys ate it up with relish and DH thought it was wonderful.

I used broccoli instead of cucumber because of family preference, the book suggests using whatever vegetables are cheapest/in season at the store. The hoisin sauce is the real flavor. :)

Chinese Noodle Bowl with Bean sprouts, carrots and peanuts


12 oz ground pork or diced firm tofu
4 cloves garlic, chopped
1-2 tsp chopped fresh ginger
2 Tbsp vegetable oil
1 bunch spring onions, thinly sliced
1 Tbsp sugar
1 tsp light soy sauce or to taste, with extra for tossing noodles if desired
5-6 Tbsp hoisin sauce (or more, to taste)
2-2.5 oz water
4 oz bean sprouts
1 lb dried Chinese egg noodles (I used ramen type noodles)
2 tsp toasted sesame oil, to taste (optional)
3-4 Tbsp roasted peanuts
1 carrot, julienned
1 cucumber julienned
2-3 Tbsp coarse chopped fresh cilantro

Stir fry the pork or tofu w/garlic and ginger in the oil for 6-7 minutes until lightly browned. Stir in half the onions, the sugar, soy sauce, and hoisin sauce. Remove pan from heat and stir in water, then return to heat and warm on medium heat. Remove from heat, and add bean sprouts

Cook noodles in rapidly boiling salted water until just ender. Drain and toss with sesame oil then serve straight away, topping each portion with some of meat sauce, onions, peanuts, carrot and cucumber and cilantro. (Or mix it all up and then serve, which is what I did.)

Thursday, November 29, 2007

Mike's Macaroni Salad


This recipe is a family favorite, and a holiday or large party standard. It is a recipe that originated from a TV show on the Food Network, though I don't remember which one.

My DH immediately started playing with the recipe and it is pretty different from the original now. It is delicious because of the way the spices play together with the ingredients, and that is mostly the same as the original recipe. Most of the work is in chopping up ingredients. Yes, it takes more than a day to make correctly, but it is worth it.

Mike's Macaroni Salad

1 (16-ounce) package salad macaroni (or ditali pasta)
1 cup celery, diced
1/2 cup red onion, diced
1/2 cup yellow or white onion, diced
1 cup medium cheddar, diced
1 cup Swiss cheese, diced
1/2 cup freshly grated Parmesano Reggiano
1 cup sweet pickles, diced (bread 'n butter work well)
1 cup ham diced
1 can drained sweet peas

1 to 2 tablespoons Lowry's garlic salt
1 to 2 tablespoons fresh minced garlic
1/2 teaspoon ground white pepper
1 to 2 teaspoons freshly ground black pepper
1/2 teaspoon cayenne pepper
1/2 teaspoon dry mustard
1/2 teaspoon celery salt
1 to 1 1/2 cups mayonnaise/miracle whip (a 50/50 mixture is best)

Add 2 quarts of water to a medium stockpot and bring to a boil. Add macaroni and cook until it is al dente, approximately 9 minutes. Do not overcook the pasta or it will fall apart when the salad is tossed together. Rinse macaroni until cool. Drain well and let it dry out slightly.

Add pasta to a large bowl. Carefully fold in celery, onion, cheddar, Swiss cheese, Parmesan, pickles, ham, and sweet peas. Refrigerate the mixture, uncovered, overnight (the flavors are much better if overnight) (refrigerate at least 2 hours).

Mix the garlic salt, minced garlic, white pepper, black pepper, cayenne pepper, dry mustard and celery salt together. Add to salad. Fold in 1 cup of mayo/miracle whip mixture to start. Add up to a 1/2 cup more of mayo/miracle whip if needed. Refrigerate again for 30 minutes to 1 hour.

We almost always double the recipe for a party, to make sure there are adequate leftovers. :)

LinkWithin

Blog Widget by LinkWithin